Getting Started With Virtual Exchange Service
Table of Contents
4. Setup Staging Database and Load data into Staging Tables
5.1 Remote Database via VES Connector
5.2 Database hosted in VES Cloud
6. Import Dataflow, Document Header and Services
1.
Introduction
The Virtual Exchange Service (VES) is a cloud based platform to host virtual nodes for data exchanges on the Exchange Network. It eliminates the need for you to create and maintain a node server in your organization. It supports all the functions of a node and simplifies the creation of data exchanges. A web application, VES Admin Portal (VESA), helps you configure your virtual node, dataflow, services, schedule tasks, etc. With these configurations, data exchange with VES is simply click of the submit button or scheduling tasks that execute data submission automatically.
This document provides a step by step guide on using VES for data exchanges with EPA CDX and other partners.
2. Boarding Process
VES is a secure environment for cloud-based web services. The service uses Network Authentication and Authorization Services (NAAS) to authenticate user and perform access controls. A potential owner of a virtual node must go through a simple registration and approval process:
1. Contact the Exchange Network node helpdesk at nodehelpdesk@epa.gov to obtain a node administrator account. You will need to supply user identity information plus organization information for registration.
2. The node helpdesk will send the request to EPA for review and approval.
3. Once approved, the node helpdesk will create a NAAS admin account with proper security policies.
4. The new administrator will then log on to the VES admin portal at https://vnap.cloudapp.net to request a network node (See Section 3 for detail).
5. EPA will review and approve the node request. The node will be provisioned and ready for service after approval.
As soon as the NAAS account is created, the owner may login to the VES and download VES related documentation in the "Reference & Tools" section as shown in the screenshot below:
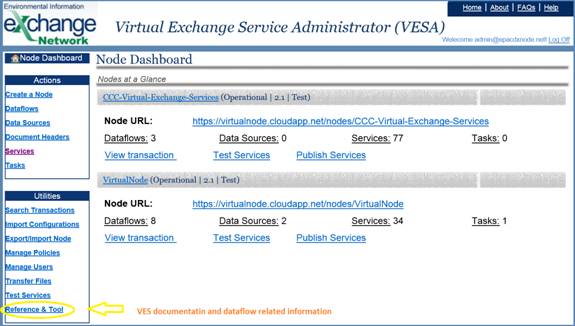
It is extremely important to download and review the "Virtual Exchange Service Admin Guide".
3. Request a Network
Node
Click the "Create a Node" link on the left panel to bring you to the New Node creation page:
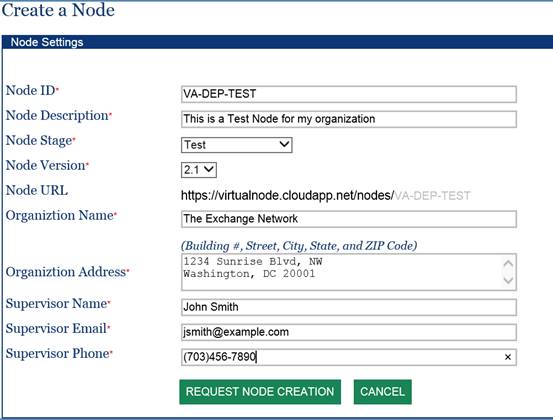
All fields on the page are required. There is one crucial item, Node ID, which must be unique and there should be no white spaces in the identifier. Each organization may have two nodes in the VES environment, one for test and one for production. It is recommended that the Node ID be the abbreviated organization name followed by either TEST (test node) or PROD (production node).
When the "REQUEST NODE CREATION" button is clicked, a new node will be created, but it will be marked as "Pending" approval. An email will be sent to EPA for review / approval.
4.
Setup Staging Database and Load Data into Staging Tables
After setting up a virtual node, you should begin establishing your staging database(s). This is the major task you must complete for any data exchange. The staging database(s) and other related information is available for downloading in the Reference & Tool section from the left "Utilities" panel:
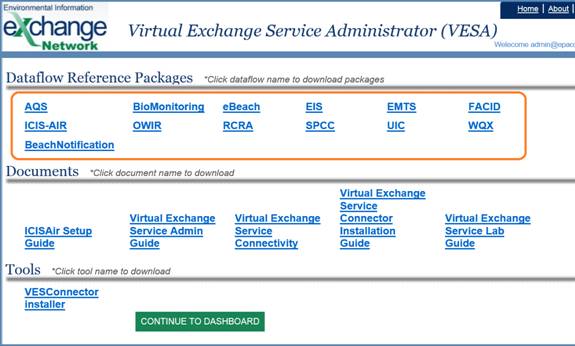
Choose the dataflow from the page and download the package. A dataflow package contains DDL scripts for both SQL Server and ORACLE to create tables in the staging database. The staging database is usually hosted in your network and protected by enterprise firewall. If you would like let VES to host your staging database, please contact VES Admin for help. Once the staging database was setup, you need either editing SQL scripts or using Extract-Transform-Load (ETL) tool(s) to loading your data into staging tables.
5.
Add a Data Source
Once staging tables are populated, you need to setup a Data Source to define the staging database connectivity for each of your network nodes. In the virtual exchange service, a data source is required to publish data to or receive data from EPA.
5.1 Remote Database via VES
Connector
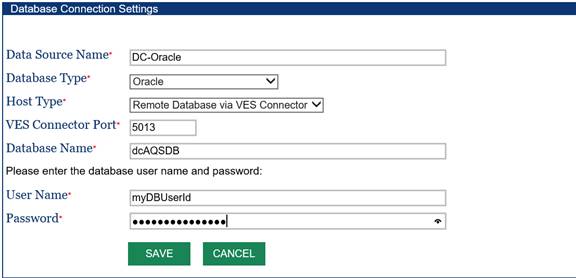
In most scenarios, the database is hosted in your enterprise environment and protected by a firewall. We have software called the VES Connector to establish network connectivity between the two environments. It can be downloaded from the "Reference & Tool" page in the VESA Portal with step by step installation instruction. The VES Connector creates a secure tunnel from your database to the virtual nodes. It has been used by many Exchange Network partners for a wide range of data exchanges.
Once the VES Connector is installed with configured remote database server(s), each remote database server needs to be registered in the VESA get a designated VES Connector Port as shown below.
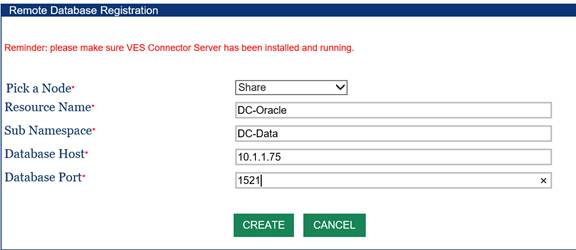
Fill out the registration form and then click, "CREATE". All fields are required.
The VES administrator will review and approve the registration. An email will be sent to you with an assigned VES Connector Port Number that in turn is used for create a data source for the remote DB as depicted below.
5.2 Database hosted in VES
Cloud
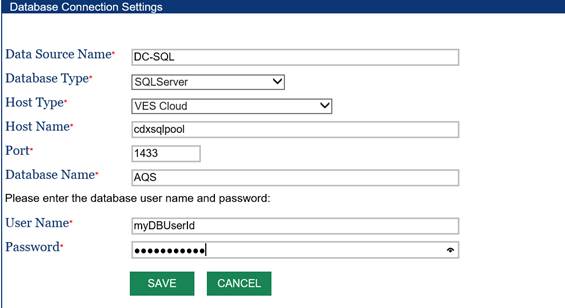
You may also use the database server in the VES cloud. In this scenario, we will create a database and all the staging tables based on your desired dataflow. The database name, as well as the login information, will be provided to you for creating a data source as shown in the following example. Please note the host name and port will be auto-filled. Click the SAVE button to create the data source.
6. Import Dataflow,
Document Header and Services
We have developed the services for all major dataflows. Before you start your data exchanges, you will need to import your dataflow, related services, document headers, etc.
1. Click on the "Import Configuration" from the left panel.
2. On the Import Configuration screen (see screenshot below), select "Share" as the source node.
3. Choose the desired Dataflow from the dropdown list.
4. Pick your node name as the destination.
5. Click on the Import button to import all services associated with the dataflow.

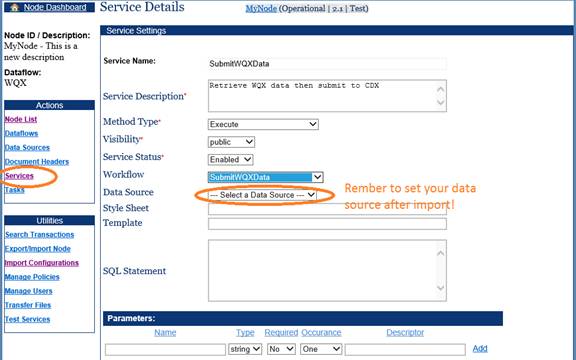
Important: This will import all services, stylesheets and parameters into your node, however, it will not import data sources associated with the services. You must manually edit the services to set your data source properly as shown below.
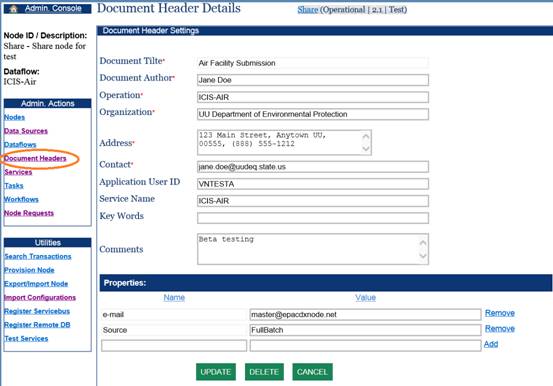
After importing, you should edit the document header so that it contains correct information. This is done by clicking on the "Document Headers" link from the left panel and choosing the header associated with a dataflow. The document header detail page will be displayed for editing as shown in the screenshot below:
7.
Test Services
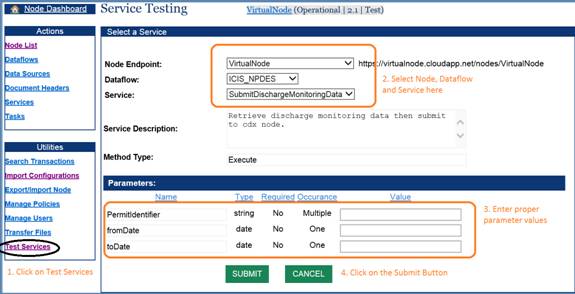
Once data is mapped into the staging tables, you may conduct some tests to check data quality related errors. This should be done in the TEST nodes. The procedure is very simple:
1. Click on the Test Services link in the left panel. The Test Services page will be displayed.
2. Select the node name, dataflow, and the service to be tested.
3. Enter proper parameter values. You may leave optional parameter as empty, but must enter values for required parameters.
4. Click on the Submit button to run the service.
If all went well, the result will be displayed. For query services, the result data set will be displayed; for other services, the system returns a transaction ID which can be used to check status later. If something went wrong, error information will be displayed.
For data submission services under the Submit or Execute method, your submissions may still fail due to data validation errors or business logic errors from CDX or EPA backend systems. VES will check status and obtain validation results and possible backend reports when available. You should check out these documents when receiving failure notification.
8.
Check Transactions
A node owner may check transaction status, view validation report and processing reports, or download the original documents. Here is how this can be done:
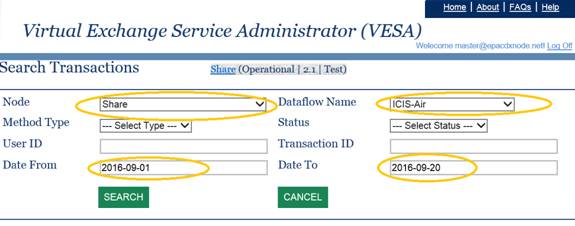
1. Click on the "Search Transaction" link in the left panel. The transaction search form will be displayed.
2. Select the node and dataflow from the dropdown list.
3. Choose a period of time (Date From and Date To).
4. Click the Search button.
A list of transactions that have met the search criteria will be displayed as shown in the screenshot below. Change your search criteria and try it again if no result set is returned.
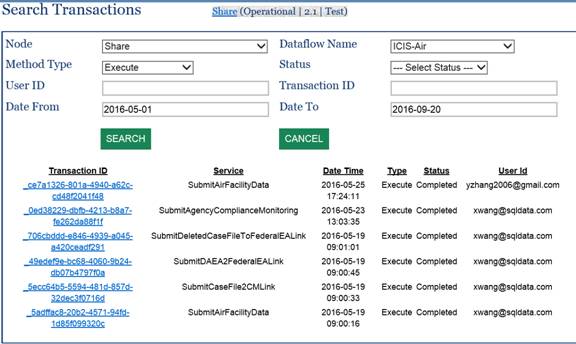
In the transaction list, click on the transaction ID will display the transaction details:
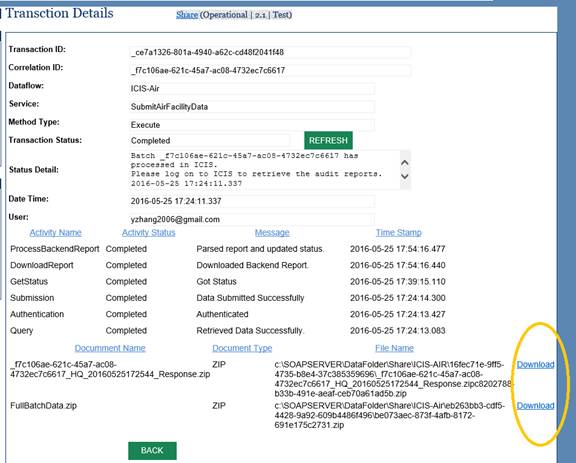
On the lower part of the screen, is a list of files (processing report, QA results, and original documents) that can be downloaded and examined if something went wrong.
If the transaction status is still "Pending" after a long period, you may click on the Refresh button next to the transaction status. This will force the system to retrieve transaction status from CDX again and process the results if available.
9.
Contact Support
You are welcome to contact us anytime for general questions, comments and technical supports.
|
EN Node Helpdesk 1-888-890-1995 |
|
For general questions, node requests, NAAS account and CDX node related questions or issues. |
|
Technical Support |
For technical issues and questions in using VES. |